How to Host a Jekyll Site on Amazon S3 and CloudFront

This post is part of a series. You can find the previous parts about setting up Jekyll, transferring a domain name from Godaddy to Amazon Route 53, and how to theme a Jekyll site.

If you have followed along from the earlier posts you will have a website running locally using Jekyll. You will also have themed your website to make it look like you want it. The next step is to push the website to a web host so that the world can see it. Note that this series of tutorials is for those with a fairly new blog who are not interested in matching permalinks to a previous website. If you need to 301 content and have more friendly URL’s then more configuration is needed on Jekyll. I won’t cover this here just yet, but might in the near future.

In this guide I intend to show you how I deployed a static website on Amazon and enabled my domain name to be used on it. Because we only deal with html and Javascript, we can use the basic S3 static website hosting from Amazon Web Services.

Why Amazon?

The reason I selected Amazon was because of using many other hosts in the past such as MediaTemple (where this site was prior to the move to Amazon), WebSynthesis (where my DevFright.com blog is), PowerVPS, RackSpace, Rochen, Blue Host, Host Gator, Linode, Digital Ocean to name a few. I wanted to try Amazon so I could see first hand how that performed. I was also intrigued on how they charge for hosting there. Unlike a mostly flat fee of the ones mentioned above, I wanted to see what it actually costs to run a blog when I pay for what I use rather than pay up front.

One thing to note as well is that I have all my blog content locally, and can switch hosting providers within an hour if needed.

Setting up a Website on Amazon

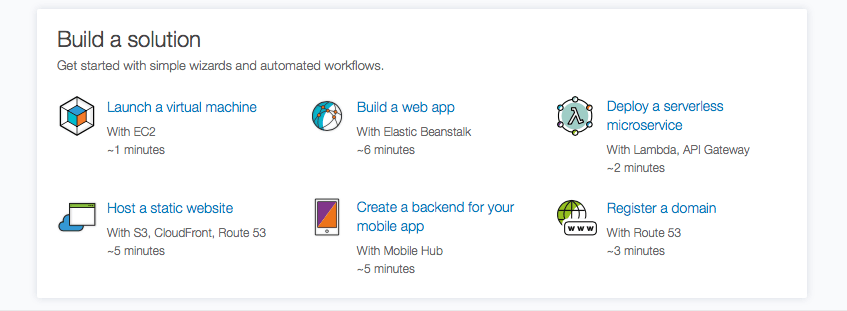
Amazon makes it really simple to setup a website with them. To do this, visit Amazon Web Services and login with your Amazon account (or create an account if you don’t use Amazon). When logged in you will see an option in the "Build a solution" section called "Host a static website". Select this option as below:
Click on the + New website button. You can’t miss it.

Give your website a name. I just put mine as Matthew Newill Blog. I opted for the example website and then clicked "Create Website".

The website is set up and you are given a sub domain to use. Of course, you might and probably will want to use your own domain. Lets set that up next. If you are running a live blog and don’t want any downtime I suggest you do this step last and just work with the provided sub domain until you are happy that everything is set up as you want it.

Transferring a Domain to Route 53

I transferred my domain name from Godaddy to Route 53. To do this I first needed to unlock the domain at Godaddy so that a transfer request could be made. You do this by logging in to GoDaddy and then going to the option to manage your domains. You then select your domain (the checkbox next to it) and at the top you’ll see a "Lock" button. Click on this and switch the lock off.

Then select the domain name so you can see its details. In that screen scroll to the bottom and select "Email my code" next to the Authorisation Code heading. A code will be sent to you. Hold on to this.

Log in to AWS and go to Route 53. Select the option (link just above where you register a domain) and click "Transfer your existing domains". If you have unlocked your domain you should be able to just proceed to transfer to Route 53. At some point you need your authorisation code. To speed up the transfer, this is what I did on Godaddy.

When the transfer is completed (it may take a few days if you are unable to speed up the process as above) then go back to the website you just created on the previous step. Click on "Buy Domain" and on the next screen, choose an existing domain. Click on "Associate Domain".
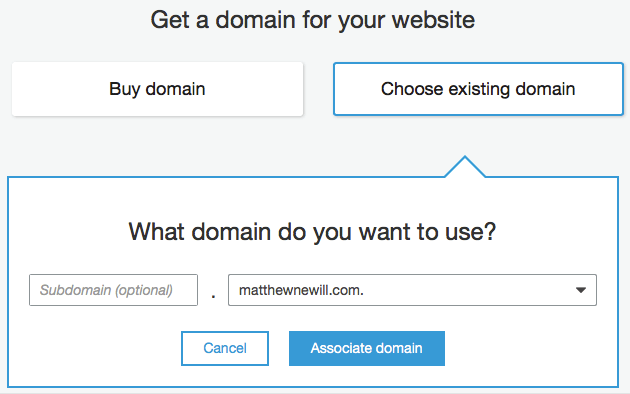
At this point, you need to wait about 15 minutes for the process to complete which associates your domain with your website.

Configure the Content Delivery Network

Now that you can load up your empty website in the browser on your own domain name, lets take at look at configuring CloudFront. To do that, click on "Manage settings in Amazon CloudFront".

In the general tab I clicked Edit and then added my domain name to the "Alternate Domain Names (CNAMEs) section. I also switched to HTTP/2, HTTP/1.1, HTTP/1.0.

When done, CloudFront is ready although you can make other alterations as needed. For example, I created an SSL certificate and added that in the CloudFront general settings tab.

Transferring Your Jekyll Site to Amazon

At this point, you could build your Jekyll site and then upload the site folder in to Amazon S3. Thankfully though, someone has created a tool that can push your site to S3 by issuing a terminal command. The setup takes a few minutes, but once done, you just need the command "s3_website push" to push any changed content to Amazon S3.

Lets set everything up. Open terminal and get to the root of your Jekyll install. Install with:

gem install s3_website

You need to generate the config file next. Do that by issuing the following command:

s3_website cfg create

A new file called s3_website.yml will appear at the root of your Jekyll install. Open this in your text editor of choice.

At the top you will see some items that need configuring such as the S3 ID, secret, bucket and cloud front distribution. This information acts somewhat like (but not really like) a username and password so that it can get content in to your S3 bucket. It also highlights where to put that information. If you generate an id and secret that is granted access to the bucket and CloudFront distribution, then s3_website will be able to upload your content.

To get this information, visit the aws console and login. Search for IAM and load it up.

On the left sidebar, select Users and then click the blue button called Add user.

Provide a username, and then select "programmatic access".

Click Next to get to the permissions.

Select "Attach existing policies directly".

Search for AmazonS3FullAccess and add it. Then search for CloudFront and add CloudFrontFullAccess. Be warned here that this gives this particular user access to all S3 buckets and the CloudFront console. For me, this is OK right now because this is all I have in my account, but please do be careful when granting access here.

Copy the Access key ID in to the s3_website.yml file and then copy the secret access key in to the same file.

Go back to the main view in the AWS console and load up S3. Here, you need to find your S3 bucket name for your website. It will be in the format of: awe-website-yourfriendlyname-xxxxx

Paste that in to the config file.

Finally, you need the CloudFront distribution ID. You get this by going to your static website settings, selecting your site, clicking "Manage settings in Amazon CloudFront" and then at the top of the page you will see:

CloudFront Distributions > EXXXXXXXXXXXXXX

Save the config file.

In the terminal run the following command:

s3_website cfg apply

If all OK, read on to find instruction on how to push the website to Amazon.

Uploading Your Website

Now that everything is confirmed and validated as working, it’s time to issue the correct comments.

Issue:

jekyll build

Check for errors. If all OK, issue:

s3_website push

Wait a few moments and when complete, load up your website at yourdomain in the browser to see if all works. If so, well done! You now have a fully working Jekyll install that you can push to the internet.

Each time you write a new post you need to build it and then push it. If you are more wise than I am, you might also want to test the site locally before pushing to ensure that all works well.
 

Changing the Theme on Jekyll

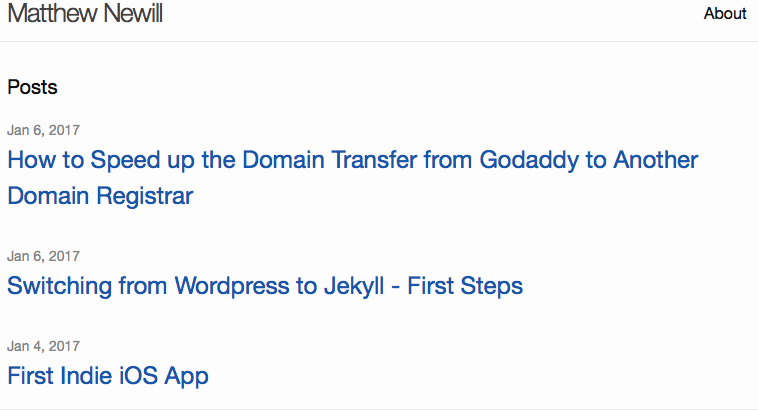
Since starting to using Jekyll on this blog I have been using the standard built in theme. If you have visited before you will have seen the blog looked like this:

The standard theme isn’t quite what I want this blog to look like. I personally prefer a few posts on the home page with full content enabled. I may at some point use the equivalent of the "more" tag so I can put an excerpt on the home page and then link to the full material, but for now I want to stick with the full content on the main page.

To make the change I needed to install a new theme. This is the first time I’ve used Jekyll, so I was also new at installing themes.

After a brief search around the Jekyll theme library I came across a theme called Lanyon. This is the one that I decided to modify and use.

How to Switch Theme on Jekyll

Before you begin, I suggest making a backup of your Jekyll folder. I used Git and committed everything before messing with the theme, that way I could switch back to where I was if needed. You might opt to simply make a copy of the folder. I’ll leave that up to you. However, in the next post I will show how I use Git and GitHub for version control on the site.

Installing the theme was fairly simple. I ran in to an issue with pagination, but also found the fix after some searching around. Here’s how I installed it:

I downloaded the Lanyon theme, extracted the contents and then folder by folder and file by file I pasted everything in to my Jekyll install being careful not to overwrite anything (such as the _posts folder… do not overwrite your own blog content).

I deleted index.md (the original index file) as there was an index.html file included with Lanyon.

The next step is to edit the config file. I commented out the old theme and added the following:

# theme: minima
gems:

  • jekyll-feed
  • jekyll-sitemap
    gems: [jekyll-paginate-v2]

pagination:
enabled: true
per_page: 5
collection: ‘posts’
limit: 0
sort_reverse: true
sort_field: ‘date’

Here I specified jekyll-paginate-v2 as one of the gems to be used. Note that I used v2 as I had problems with jekyll-paginate. From my understanding, jekyll-paginate development has been discontinued. V2 seems to build on the original.

Next, I set the pagination options. I set enabled to true, per_page to 5 on "posts" only. The limit of 0 I believe means that all posts on my index.html page will be paginated and it won’t restrict it to the first XX amount of posts for example.

The sort_reverse had me confused. I expected it to be needed as false, but for me the correct order was true. I also specified the sort_field to be based on the date of the post. You can sort by others such as title, author, and others if needed.

After getting the main config file ready I also needed to add the following to the gemfile file:

gem "jekyll-paginate-v2"

You can now build your site and run it on the local test server on localhost:4000 as follows:

jekyll build
bundle exec jekyll serve

At this point you should see the Lanyon theme with your own content (assuming you didn’t wipe out your _posts folder).

Customising Lanyon

I made a few more tweaks to make it my own. I’m not particularly interested in the slide out menu from the side. Instead, I’ll add a single nav bar below my name which will run the width of the page. To remove the sidebar I modified default.html found in the _layouts folder. I also made some tweaks to the _includes folder as well as the other files in _layouts just to get the site looking the way I wanted.

After removing a few items I managed to get the site to look as I want it. I built the site and all looked good.

Next Steps

The next step is to move the blog to the internet for hosting. I chose Amazon to host the site and will go in to details of how I set that up in the next post.


How to Speed up the Domain Transfer from Godaddy to Another Domain Registrar

Yesterday I started the process to move matthewnewill.com from Godaddy to Amazon Route 53. I went through the process of unlocking the domain at Godaddy, getting an authorisation code from them, and then starting the transfer steps in Route 53. All went fairly smoothly (except a billing issue where my card had just expired a few days ago).

When the billing issue was resolved (only took a few minutes), the transfer proceeded to step 7 in Amazon which is Waiting for the current registrar to complete the transfer (step 7 of 14). Godaddy sent an email yesterday saying:

If you wish to cancel, or did not request this transfer, log in to your account before 09 January 2017 by clicking the button below to decline the transfer.

I wanted things to go quicker than the 9th January, so I did some Google searches and found a tip that suggested you go in to Godaddy and accept the transfer manually. I did that and about 2 minutes later I got an email from Amazon saying the domain transfer was complete.

How to Manually Approve a Domain Transfer in Godaddy

To manually approve a domain transfer in Godaddy you login, go to Manage My Domains. At the top left, click on Domains and then Transfers.

You should see your domain name listed under "Pending Transfers Out". Click the checkmark, and then click on the Accept/Decline button. Select the correct option to accept the transfer.

What Next?

Just wait. When you complete this step in Godaddy it expedites the domain transfer. The instructions I read indicated it could be about 24 hours before it happens which is far better than waiting a few days. However, for me it was just a couple of minutes.


Switching from WordPress to Jekyll – First Steps

I wanted to switch from WordPress to Jekyll on this blog. I first started using WordPress on May 17, 2006 on another blog and have since used it regularly, and for a period of time between 2009 and 2011 I posted multiple times a day. Since starting this new blog several weeks ago I came across a handful of sites that use Jekyll. After a bit of study I decided it was time to test it out. With this being a fairly simple blog that is mostly lots of text and sometimes an image or 2, I decided it would be a good fit, or at least I think it will be a good fit.

What I will Cover

I will be walking you through how I installed Jekyll on my iMac. I will also be explaining what does what in Jekyll although it will be a very basic tutorial on how to publish a post and test the site locally.

What I won’t cover is more in-depth things such as permalinks, themes etc… although I will at a later date.

Requirements

The requirements are extremely basic to run a Jekyll website. Jekyll is installed locally. You write your content locally in Markdown. You build the site. It spits out a static website in html and you then upload that to a web server of your choice. There is no database and no need for anything fancy to be installed on the server.

The Process

After finally getting to grips with how Jekyll works I decided that I need to create a new workflow to make the transition worth it. In WordPress it’s quite simple. I can log in from any browser, click New Post, write, publish, and be done. With Jekyll there’s a few more steps involved that all seemed a little complicated when I first came across them. Now that I have Jekyll installed I actually find it’s quite simple to use and quick to update.

What I am Using

In this post today I want to just show what I am using locally. In my next post I’ll write about what I am doing to get that content to a server and where that server is located.

Locally I use the following:

  • Jekyll (as expected). This powers the website.
  • iA Writer. Used to write my content. I use this on macOS and iOS. You can use any text editor that you want. I just like this particular one at the moment. If I want to switch to another, that’s no problem because markdown is just text.
  • DropBox. I store my blog in a DropBox folder as it works well for syncing to my iOS devices and my MacBook.
  • Git. I use Git for tracking the changes made. My plan is to commit each successful build and send to GitHub. That way, if I am making large modifications and mess it up, I can just step back and start from where the site was working previously.

I might consider TextExpander in the future which I think will be helpful for some common text such as the front matter, code snippets, etc… but I haven’t ever used it and don’t even know if it’s compatible with iA Writer. It isn’t too important to me in the first stages.

Installing Jekyll

The instructions are simple to follow on the Jekyll website. I just followed the quick start instructions on the main page. To do that, open Terminal and navigate to the folder where you want to add your new blog to. In my case I entered

cd dropbox
cd apps

Install Jekyll by entering (note that this command isn’t related to the ones above… you can install Jekyll as soon as you open terminal).

gem install jekyll bundler

Next you generate a new site by entering:

jekyll new websitename

In my case I called it MatthewNewillBlog so that I can identify it.

When this is done it runs through the process of building the site. When done:

cd matthewnewillblog

To test it’s working enter:

bundle exec jekyll serve

Then open a web browser and go to http://localhost:4000

You will see a basic website running now.

Configuring Jekyll

The main configuration file for Jekyll is called _config.yml found in the root of the Jekyll install. Open this with your favourite text editor. To do this I opened the finder, navigated to my Jekyll install, opened the file with Textastic.

There are a few items to modify in here. You can give the site a title, an email, a description, as well as a URL. There are also some build settings which I haven’t modified just yet.

After making the changes, save.

To see those changes we need to rebuild the site. The command for that is (make sure you ctrl-c if the server is still running):

jekyll build

When it completes you can start up the server again with:

bundle exec jekyll serve

When the server is started, reload the website. You should see your changes reflected on the page.

Structure

The basic structure of Jekyll is that you have a _posts folder and a _site folder. _posts is where you content is put that you want to go live on your site. The _site folder is generated automatically when you used the ‘jekyll build’ command. The contents of this folder are what you upload to your webserver after building the site.

Creating a New Post

Creating a new post can either be done in a _drafts folder, or you can create it in the _posts folder. If you use the _posts folder, just be aware that you might end up publishing a half baked post if you do a rebuild and sync the _site folder, so be careful with that option. For example, you might start working on a post, add the front matter, forget about the half finished post and leave it there and create something new. On your next build you may upload half a post that wasn’t intended for the blog. Be careful!

Open your text editor and create a new file. The filename needs to be in a specific format which is:

YEAR-MONTH-DAY-post-title.md

If I want to publish a post with todays date that would become (my-post-title is what I want to call it. I guess that would be classed as the post slug in WordPress):

2017-01-06-my-post-title.md

When the text file is created you then need to create front matter in YAML as a block at the top. The front matter block for this post looks like this:

layout: post
title: "Switching from WordPress to Jekyll – First Steps"
comments: false
date: 2017-01-06 11:12:32

It starts and ends with 3 dashes. The in between parts provide some needed information such as it uses a post layout, has no comments, and has a title. The date/time is in the following format:

YYYY-MM-DD HH:MM:SS +/-TTTT

The time and offset are optional. If you post a few times a day it could be worth specifying the time. I do just because it’s easy enough to do although I don’t use an offset.

More details about Front Matter can be found here.

When the front matter is in place, you can now write your blog post. You write in markdown or HTML. I am fairly new to markdown so won’t try give a tutorial on how it works. All I am doing is starting with the basics such as creating links and using bold text. Because my previous posts had some HTML for images, I just left those as they were, but there is syntax in markdown to specify images. You can read about all of what markdown can do over here.

Publishing your new Post

Now that your content is written and you are ready to publish, it’s time to test.

If your post isn’t already in the _posts folder, move it there.

In terminal navigate to the new blog folder.

Run the following command:

jekyll build // Note that you probably don’t need to ctrl+c from the server as it seems to build automatically on the fly… but if you don’t see changes then I suggest rebuilding.

Followed by:

bundle exec jekyll serve

When you load up the website at localhost:4000 you should now see your new post. Note that you will also see another post which was automatically put there when you installed Jekyll. To remove that, just delete it from the _posts folder and rebuild your site. I hope that by testing doing this that you will see how easy it is to manage your Jekyll install.

In the next post I’ll explain how the theme can be changed and how you can change the structure of your website. After we have the website looking good on the local server I’ll move on to explain how to put the site on to a webserver.


First Indie iOS App

Today I decided to get started on my goal of creating iPhone apps for myself as an indie developer. As mentioned yesterday, I have a few things I want to accomplish this year. My first release will be a pedometer app. There are several already in existence on the app store, but none of which do exactly what I want them to do.

If we rewind back a few years to 2013, I actually started this project in September that year just after the iPhone 5S was announced. However, like all other previous attempts at finishing my own apps I was sidetracked and ended up doing more work for clients. My app never got finished and sat in BitBucket gathering dust.

Moving back to today, I actually created a new project a few weeks ago and started creating some classes to stub out. Christmas happened and I took time off, and then today is when I am officially starting and writing some code for the app. The reason I created a new project is that I want to create this version (and finish it) in Swift. The previous version was written in Objective-C. It just seemed like a better option to start from scratch than working with everything I had from the previous attempt.


Just for fun I decided to download the repository for the app as I left it in 2013 and after adding a couple of privacy description keys to info.plist it worked. To the left is a very bad looking screenshot. At the point I got to in developing it a few years ago I had just extracted data and had it represented on an hourly chart. The chart I used in the demo app was MyAppControlls iOS Bar Chart View. I may use this in the new project if there are no problems with it, or I may create my own with PaintCode in a similar way I demonstrated how to create a line chart with PaintCode on my tutorial blog.

First Steps

Having redone the design a few weeks ago to bring it to iOS 10 standards, I have everything I need on paper. I know what each view will look like. I’ve been through the several steps of design of which I highly recommend reading this article by Michael Flarup who speaks of the process of designing an app. I even have the classes I need written out and the relationships between them although some testing is needed to determine if modifications are needed (see next paragraph).

So my first step in the Xcode project is to work on fetching the motion data, then work on fetching Health Kit data for historical data, and finally I want to work on tests to see how quick data can be extracted from Health Kit. Will it be acceptable to just extract direct from Health Kit for weekly, monthly, yearly data representations? or will that cause delays in putting the data on the view? I don’t know yet as I haven’t tested the import speed. It might be that I opt for Core Data and do a one-time import of historical data from HealthKit so the app can analyse it more quickly when needed.

By the end of the day I expect to be extracting data from Core Motion and passing that to the view to put on screen.


2017

The New Year Begins

Today is the first workday of the year for me. Over the Christmas period I thought about what I want to achieve in business and life over this year. I also looked at what was achieved in 2016 to see where I might have gone wrong and what I could have done better at. There is plenty of room for improvement. Some time was wasted by idling it away. I need to avoid social media through the day as well as news websites.

Although I don’t feel the need to share my specific goals here, what I decided to do was create a list of all things that I wanted to complete by the end of this new year as well as what I want to do each day, month, or year. I quickly realised that all items are far more than I could physically accomplish, but instead of cutting things out, I prioritised what each day would look like for me. Rather than measuring success by the number of jobs complete and the number of tasks marked as done by the last day of the year, I decided that my success this year would be measured by how I spent my time and if I did good things with my allotted time.

Some Goals

There are many things that I want to accomplish such as reading XX amount of books, but I don’t want to get inundated with the calculations of how many pages per day and what books I want to read and how many pages each are. It feels too mechanical. Instead, my goal is to simply read each day for at least a certain amount of time. If I accomplish that then I will read XX amount of books in a year. That won’t matter if it’s 10 or 50. The success will be that I managed to keep the commitment for the year.

Another goal is to create my own apps for the iPhone and Apple Watch as an indie developer. I create apps for others, but when I plan on making my own apps, I always get sidetracked in to working for others again. I have many incomplete apps that could be finished. I want to change that in 2017 and create my own apps. Just like book reading, the success for me will be measured by the amount of time each day I spend creating the apps. I may end up creating just a couple or several, but if I feel I have worked honestly each day for a few hours, then I will define that as success regardless of what the outcome is. Of course, I include promoting the apps to contribute as part of the success although creating them is the first step. I can’t promote something I haven’t created.

Some of the tracking will be done by simply looking at the contributions graph in GitHub. If I can fill Monday to Friday with green, then that will be success. There’s no point me cheating by committing a minor change to turn a square green. I will know if a green is well earned. If it looks like 2016 as seen below, I clearly will have to put a lot more effort in.

I want to become a better writer. For that reason I plan to regularly update this blog, perhaps showing my progress in some cases, as well as put more time in to my iOS tutorial website.

Writing isn’t my strong point, but I expect that writing regularly will help to change that a little.

There are several other things I want to achieve. I want to take my DSLR everywhere I go instead of relying on just my iPhone 6. I would like to learn how to use it by using it.

Family

Also, I want to spend more time with family. I am lucky with working at home but at the same time that brings challenges of not shutting off from work when the children and my wife are around. I need to do better there.

Tracking

While reading MacSparky earlier today I came across an app called Productive which helps track habits. For me I need to make a habit of writing regularly, reading regularly, and creating regularly. I also need to look after fitness as well which I expect this app would be great to encourage me not to break a streak of going to the gym.