Recently I wrote about learning Python by creating a chess game. I am new to Python, although not new to programming. Python has intrigued me for the last few months, especially how popular it seems to be (second place on GitHub fourth quarter 2020). When an opportunity came up to work with some friends and learn it I jumped at it.
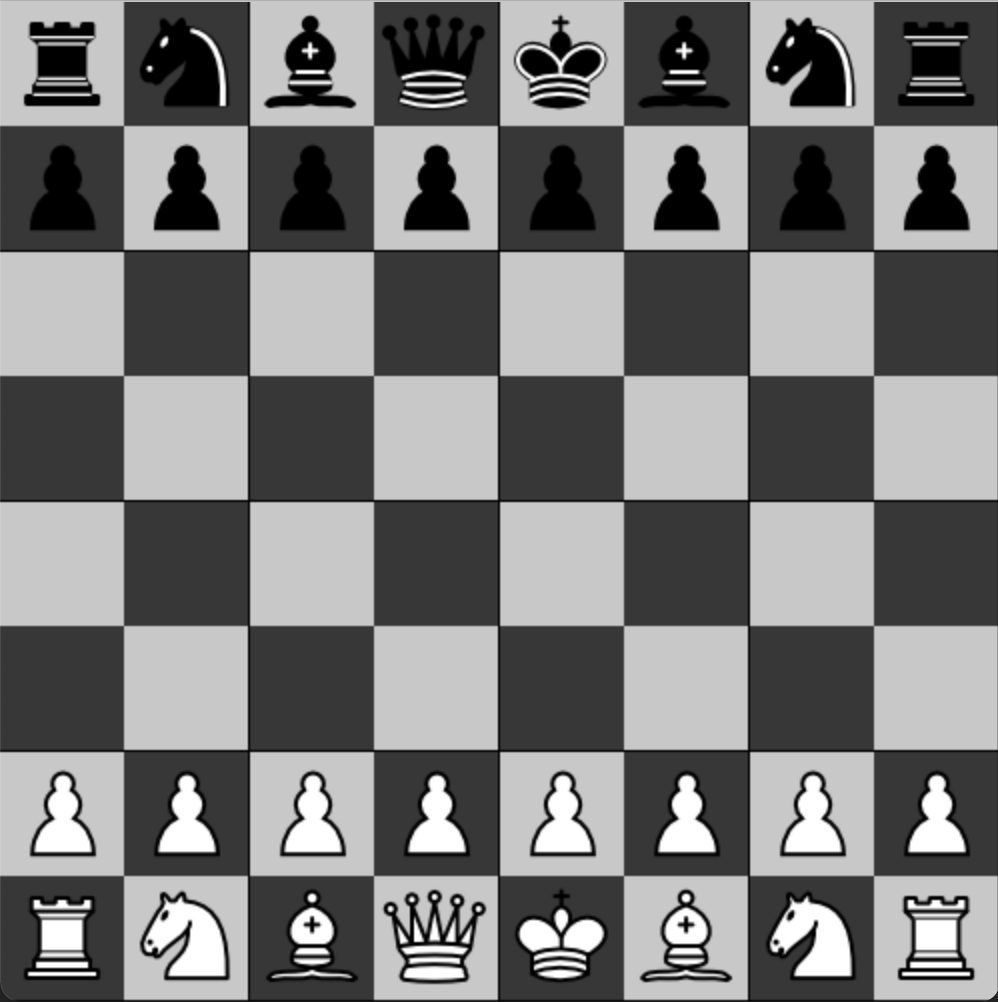
In the last post about the chess game I wrote about getting familiar with Pygame and was able to programmatically draw a chessboard on the screen. I didn’t make much of an attempt at classes and structuring the program in any good way. In this post, I want to show what I have managed to accomplish as part of my teamwork. The image above shows how it looks now when I run the program.
I added some folders to the project. The first one is a pieces folder and contains seven .py files. Six of them are classes for each piece. The second folder is for resources, called res, and within that is an img folder containing images of the different chess pieces.
Chess Pieces
Lets take a look at the Pawn class:
from pieces.piece import Piece
from piece_type import ChessPieceType
from chess_colour import ChessColour
import pygame.image


class Pawn(Piece):

    def __init__(self, chess_colour):
        self.piece_type = ChessPieceType.PAWN
        self._piece_image = None
        super().__init__(chess_colour)

    # piece_type setter/getter
    @property
    def piece_type(self):
        return self._piece_type

    @piece_type.setter
    def piece_type(self, value):
        self._piece_type = value

    # piece_image getter
    @property
    def piece_image(self):
        if self.chess_colour == ChessColour.BLACK:
            return pygame.image.load("res/img/pawn_black.png").convert_alpha()
        else:
            return pygame.image.load("res/img/pawn_white.png").convert_alpha()
Each piece inherits from piece.py which contains the Piece class. The reason I went with inheritance is that every piece has some of the same attributes such as its colour and if it’s active or not (active meaning it is in play and hasn’t been taken off the board). But, each piece has differences such as a type (meaning Pawn in the example above) and an associated image.
Line 1: I import Piece from pieces.piece which means the piece file is in the pieces folder.
Line 2: I import an enum here so I can specify what each piece is. Perhaps I could have just used a string and specified “Pawn” as the piece type, but I went with an enum instead out of habit from other languages and because the names of pieces are constants.
Line 3: I import an enum called ChessColour that also provides constants of BLACK or WHITE.
Line 4: I import pygame.image because it is needed later when I return the correct image to represent the piece.
Line 7: The class is declared. I called it Pawn and with Piece being passed in as a parameter it indicates to Python that Pawn inherits from Piece and in doing so, contains all of its attributes.
Line 9 is where the init method is declared. Whenever a Pawn is instantiated, the init method is called and sets up the properties as needed. In this case, I pass in if the piece is black or white. I then manually set the piece_type property using the enum and set the image to None.
You will see on line 12 that I call super init which calls the init method of the superclass so that the piece colour is set.
Lines 14-21: I declare a getter and setter in this section of code. The getter is used to find out what type of piece this object is, and the setter is used to change the piece type.
Lines 23-29: This contains the getter for the piece image property. A surface is returned based on what colour the chess piece is. I also use convert_alpha() to ensure that the transparent background on each image is used.
The Piece class which the Pawn above inherits from is as follows:
class Piece:

    def __init__(self, chess_colour):
        self._chess_colour = chess_colour
        self._is_active = True

    # chess_colour getter
    @property
    def chess_colour(self):
        return self._chess_colour

    # is_active setter/getter
    @property
    def is_active(self):
        return self._is_active

    @is_active.setter
    def is_active(self, value):
        self._is_active = value
It contains two properties, the colour of the piece and if it’s active or not. I didn’t pass in is_active as a parameter because when a chess piece is instantiated, it will always be active.
The chess_colour property has a getter that returns the item from the enum (either BLACK or WHITE).
The is_active property has both a setter and getter. The setter is used to deactivate or reactivate the chess piece.
Chessboard Class
After creating all of the pieces I moved the chessboard class out to its own file. This has the following properties:
- x_start
- y_start
- width_height
- chess_colour
- position
- Piece
The x and y start properties are used for determining the position on screen of the top left corner of each square.
The width_height stores how many pixels the width/height of the square is.
The chess_colour property determines what colour the square is.
Position is a more friendly A1 – H8 reference stored as a string. It seemed better to use that property to determine what square was clicked on than passing back difficult to understand x/y coordinates of a square.
The Piece defaults to None on instantiation, but when pieces are added to the board, or when they move around, an instance of the Piece class which includes its properties will be stored here. Note that this Piece class will be either a Rook, Pawn, King, Queen, Knight, or Bishop Piece.
Setters and getters, if needed, are also included in this class. Not everything has a setter or getter.
Setting Up the Chessboard and Pieces
At the moment the main.py file has a few methods.
def create_board_square(x_array, y_array, chess_colour, position):
    # Check if the screen is not square, and choose the smallest length
    # divide the smallest dimension by 8 to get the size of each square.
    if SCREEN_WIDTH < SCREEN_HEIGHT or SCREEN_WIDTH == SCREEN_HEIGHT:
        width_height = SCREEN_WIDTH / 8
    else:
        width_height = SCREEN_HEIGHT / 8

    # Finding the top left corner of each square
    x_coordinate = x_array * width_height
    y_coordinate = y_array * width_height

    # Instantiating a board square with the coordinates, width/height, colour and if occupied and its coordinate.
    return BoardSquare(x_coordinate, y_coordinate, width_height, chess_colour, position)
This method creates a board square from coordinates, colour, and position.
Lines 4-7 determine the screen width or height which are constants declared earlier in main.py. It uses the shorter dimension to set the width_height property that will be used to instantiate a BoardSquare object. The reason for this is so that if a board is setup wider than it is tall, then the board will fit in the height and not run off the screen.
Lines 10 and 11 are used to set the coordinate of where the square will be on the screen.
Finally, we instantiate BoardSquare with the details and return it to the caller.
Alternate Board Square Colours
I set up an alternate_colour method that takes a ChessColour object and if it’s black, it swaps it to white and vice-versa:
# Alternates the colour between BLACK and WHITE.
def alternate_colour(colour):
    if colour == ChessColour.BLACK:
        return ChessColour.WHITE
    else:
        return ChessColour.BLACK
The method above is fairly simply. You pass in a ChessColour and it returns the other colour from the ChessColour enum. This is used when putting squares on the board. They alternate on each row from black to white, and then the same again but starting with the opposite colour.
Creating the Chessboard List
I create a multi-dimensional chess_board list next:
chess_board = []
square_colour = ChessColour.BLACK
for y in range(8):
    chess_row = []
    square_colour = alternate_colour(square_colour)
    for x in range(8):
        position = chr(x+65) + str(8-y)
        chess_row.append(create_board_square(x, y, square_colour, position))
        square_colour = alternate_colour(square_colour)
    chess_board.append(chess_row)
Line 1: Create a chess_board list.
Line 2: creates a square_colour which will be used to set the colour of each square as it is instantiated.
Line 3: We loop around the y axis which moves us from the top to the bottom of the screen.
Line 4: We create another list called chess_row. The idea I had here was to append chess_row to chess_board making chess_board a two-dimensional list. This means that we can store rows that have eight squares in each to represent the columns.
Line 5: We alternate the square colour. In line 2 it defaulted to BLACK, but the top left colour on a chessboard is always white, so I alternate this here back to white to begin. I’ll explain more of this later on in this section of code.
Line 6: A nested loop is created that works across the x-axis that allows us to create board squares across the row.
Line 7: This is used to determine the friendly position name. By getting the character of x+65 it makes the initial zero on the first run of the loop equal to A, and then we append 8-y which is y for the outer loop, so 0 on the first run. 8-0 is 8. As it runs across it sets position to A8, B8, C8, D8 and so on. On the next run of the outer loop X will increment and make the first character 1, and the 8-y will be 8-1 which equals 7 making it A7, B7, C7 and so on.
Line 8: We create a board square with the colour of white on the first run and append this to the chess_row.
Line 9: The colour of the square is swapped to black in preparation for the next square in the row. When it reaches the end of the row, line 10 appends the chess_row list to the chess_board list.
The outer loop then increments, but if you notice on a chessboard, the last square on the first row is the same colour as the square on the next row. This process repeats down the rest of the board. On the last iteration for the nested loop, the colour was set to white on line 9, but the colour on row 2 needs to be black. This is why on line 5, I alternate it back on the outer loop. There might be a simpler way of doing this, but this seemed a decent approach to me. The only caveat is that to get a white square at the top left, the initial square colour is set to black, which really isn’t a caveat.
Determine What Square the Mouse Clicked
I needed a way to determine which square the mouse clicked on. To accomplish this I used a bit of if/then logic to determine if the appropriate square had been found. I return the board_square object so that when it is clicked on, the piece and other properties can be accessed.
def get_square_for_position(x, y):
    for row in chess_board:
        if row[0].y_start < y < row[0].y_start + row[0].width_height:
            for square in row:
                if square.x_start < x < square.x_start + square.width_height:
                    return square
This section of code is one that works well, but when my IDE offered to simply my if statements, and I accepted, it actually made it a little harder to understand. I think it’s written well and it seems to work flawlessly, but I’ll explain what it’s doing.
Line 1: The x and y coordinate of the mouse click us passed in.
Line 2: Cycle through each row list stored in the chess_board list.
Line 3: On this if statement, row[0] is used to just grab the first square in the row. Because we are checking if the mouse click is within the height of this row, we can choose any of the 8 squares to search, but I decided to check the first one. We check the y_start of the first square. If we’re on the third row down then y_start might be 150. If we clicked at 167 then yes, y_start is less than 167. We then check if y is less than y_start (being 150) plus the width_height of the row. If that width_height was 50 pixels, then is y < 150+50. Yes, it is. 167 is less than 200. This test passes, so we go on to the nested loop.
Line 4: Now that we have found the correct row, this next step loops through each square and checks if the mouse pointer is between the x_start and the x_start + width_height. If it is, it returns and if not, it tries the next square in the row.
Chessboard
The above classes and methods put in place provide what is needed to draw the chessboard on screen. At this point in the code, I haven’t yet reached the main loop. My plan was to draw the initial state of the board before hitting the game loop and then use the loop when the game was in play.
for row in chess_board:
    for square in row:
        surf = pygame.Surface((square.width_height, square.width_height))

        if square.chess_colour == ChessColour.WHITE:
            surf.fill((200, 200, 200))
        else:
            surf.fill((55, 55, 55))

        rect = surf.get_rect()
        screen.blit(surf, (square.x_start, square.y_start))
        pygame.display.flip()

        if "7" in square.position:
            square.piece = Pawn(ChessColour.BLACK)
            screen.blit(square.piece.piece_image, (square.x_start, square.y_start))
        elif "2" in square.position:
            square.piece = Pawn(ChessColour.WHITE)
            screen.blit(square.piece.piece_image, (square.x_start, square.y_start))
        elif "A8" in square.position or "H8" in square.position:
            square.piece = Rook(ChessColour.BLACK)
            screen.blit(square.piece.piece_image, (square.x_start, square.y_start))
        ...

        pygame.display.flip()
The example above is what I use to draw the board on screen and also add the pieces. I have cut most of the if statement out because you can see enough of what’s happening with just part of it.
Lines 1 and 2: The for loop works through the chess_board and the nested loop on line 2 works across each row.
Line 3 creates the surface for the square. I pass in the width_height twice for the x and y axis.
Lines 5-8 are used to determine the colour of the square. If it’s white I use 200, 200, 200 as the RGB values. This is off-white because the white chess piece images were hard to see. Likewise, the black is more grey at 55, 55, 55 so that the black chess pieces are more visible.
Lines 10-12 are used to put the chess square on the screen. The x_start and y_start properties are used to specify the top left corner of where the square will be going.
For the rest of the code, I ended up using a lot of if and elif statements. I couldn’t think of a way to programmatically add pieces based on position except for perhaps a list of what goes where, but I decided to just use logic to determine if a square has a piece or not. Take the pawns for example. If I’m on the second row down, it’s a full row of black pawns and if on the second to last row, it’s all white pawns. I then just used statements such as if A8 or H8 then add a black rook to the square.
When running this code, it now shows a chessboard with all of the pieces in the right places.
Broken Bits
The only parts broken at the moment is the positioning of the chess pieces in each square and the resizing of those chess piece images. Unlike the squares that can resize by editing the width and height constants, the pieces do not resize. They look great when the board is 500 x 500 pixels, but any smaller then the pieces are bigger than the squares they are in, and any larger for board dimensions, then the pieces get smaller. This is just a quick fix.
Also, the pieces are not centred by default. They are aligned top left. I need to add some logic to put them in the middle of each square.
Other than those problems, things are working well so far. I think the organisation of classes is going well so far. I mentioned last time I wrote that my focus was going to be on MVC, but this time I just focussed on organising classes. My next update will be to move pieces and then at the same time I’ll make sure I stick to MVC principles to separate logic from the view.
Chessboard pieces: “PNG chess pieces/Standard transparent” by Cburnett is licensed under CC BY-SA 3.0