I purchased my iMac in 2010; I opted for the lowest spec model. A year after buying it I upgraded the RAM from 4GB to 16GB and about a year after that I had to replace a faulty hard drive. Apple recalled the original drive due to a fault in the firmware on the drive, I ignored the product recall and then found I had to replace it when it broke just out of that recall window.
After 6 years and several OS updates, the old spinning disk just wasn’t cutting it anymore. I didn’t want to pay over £1,000 for a new iMac so instead I went the route of upgrading the hard drive to an SSD.
Rather than me explain how to take apart a mid 2010 27 inch iMac and upgrade to an SSD, I thought I’d just share with you the items I purchased so that you can see what worked for me. I spent hours trying to decide what would work and what would not. The full iFixit guide should be sufficient for you once you have chosen the drive and adapter that you will use. One of the options could be to leave the HD where it is and then use the optical drive area for the SSD. My optical drive broke years ago, but I just left it where it was this time around.
The drive I selected was the Crucial MX300 1TB SSD. The MX300 is a SATA 6.0Gb/s device although this particular iMac (the mid 2010) works on an older SATA standard at 3.0Gb/s. The reason I went for this was so that when I do get rid of my iMac and upgrade, I can keep the SSD and use it elsewhere in a machine that can use it to its full potential. The downside is that I won’t get to use the SSD to its fullest potential in this machine. In fact, the fastest it will work is at the 3.0Gb/s standard. But don’t worry, you won’t regret the upgrade once performed; it’s super quick.
I purchased my 1TB SSD from Amazon in the UK and paid around £230 for it. Here is the drive that I ordered. The same model can be found on the US Amazon store here. It is priced at $244.43 at the time of writing this.
The Crucial MX300 is a 2.5″ drive, but the iMac uses a 3.5 inch hard drive. I am sure you could probably secure the drive by some other means, but I purchased a 2.5″ to 3.5″ AdaptaDrive from NewerTechnology, again on Amazon. This worked perfectly for what I needed. The Amazon US store sells it here.
One optional item that I chose not to buy but might do at a later date is a temperature sensor. I haven’t tested this cable, but have read reports that others have and that it works well. It is available on Amazon UK here, and Amazon US here. Instead, I just wrapped the old sensor around the frame to keep it from dropping down behind the circuit board(s).
Instead of using a temperature sensor I downloaded an app called SSD Fan Control which allows me to select SMART for the hard disk which appears to use the temp sensor built in to the drive. The only downsides that I have come across so far are that when the Mac is rebooted, the fan will spin at full speed until SSD Fan Control starts up. From a cold boot it does not spin up as the overall temperature is lower. Also the fan was on full speed for the duration of the operating system reload.
I may purchase a temp sensor in the near future, but so far all appears to be running just fine without it.
The only other items you need are the following:
-
A good backup of your files. I use BackBlaze and Time Machine. Although BackBlaze is a paid server at $50/year, I find it invaluable as when my first hard drive failed (my fault), I had a 600GB or so backup that I could download and use.
2.You will need the correct screwdriver(s); T10 Torx screws are used as well as T8 Torx for the drive. A precision screwdriver set typically contains these. One option is this one from Amazon in the UK with this option for Amazon in the US. -
Suction cups are needed to remove the glass on the front of the iMac. iFixit shows that you need 2, one for the top left and one for the top right. I’ll whisper this as I’m sure this isn’t recommended, but I used one of the kids bath toys with suction cups on the back. It worked just fine. It just needs to be strong enough to overpower the magnets that hold the glass in place.
If you have all the items above, you are ready to upgrade to an SSD. After I installed Sierra when all came back up, I installed the SSD Fan Control app, and also Disk Sensei. I enabled Trim but if I am honest, I do not know if this is needed or required. I did read that if the drive supports Trim then it will be just fine and if not, I’ll just need to disable it. After a few weeks of running my iMac with this SSD and Trim enabled, I’ve had no problems at all.
Is the iMac 27 inch Mid 2010 Quicker with an SSD?
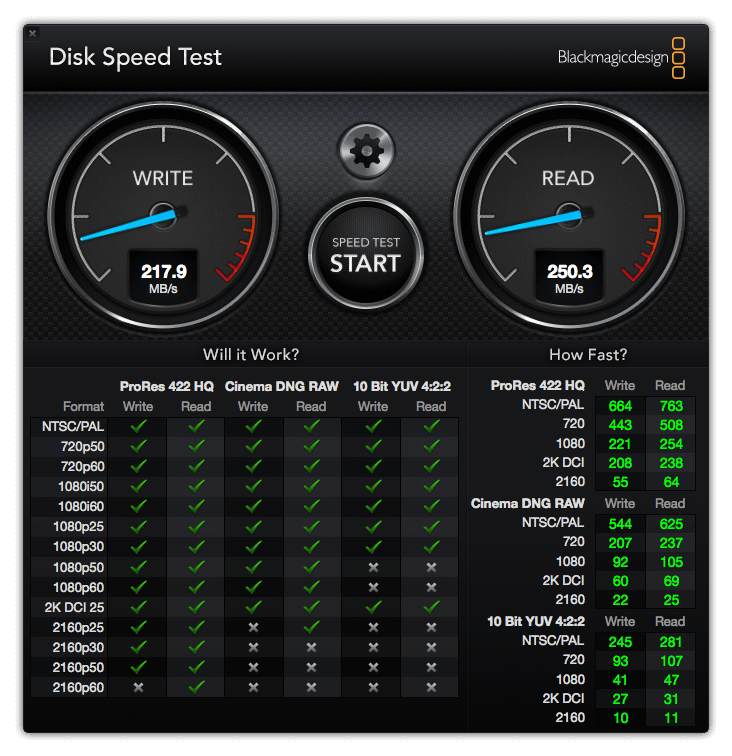
I have to say that my iMac feels like a new machine when I now use the SSD. Of course, the processor is still from 2010, but the disk is far newer and when it was a spinning disk previously, it was so sluggish. It would take a good 30 minutes to reboot and settle down clicking away that it became frustrating to even power it off. Now that it runs an SSD I can be up and running within a minute or 2. From my understanding, the drive works at half the speed of its potential due to the 2010 iMac using the old SATA standard, but the speed increase is great and I no longer have apps freeze while the hard drive churns away in what seems like an endless shuffling of files.